
8 min read

NetSuite offers many different banking statement functions designed to increase productivity and accurately track your income. Today we will focus on importing online data, intelligent transaction matching and reconciling bank data for your individual business needs.
We will also highlight the latest supported financial institutions, bank feeds and banking improvements in NetSuite. Check it out!
Importing Online Bank Data
In order to import banking data into your NetSuite account, you need to first download the statement from your financial institution or credit card company.
1. From your dashboard click Transactions.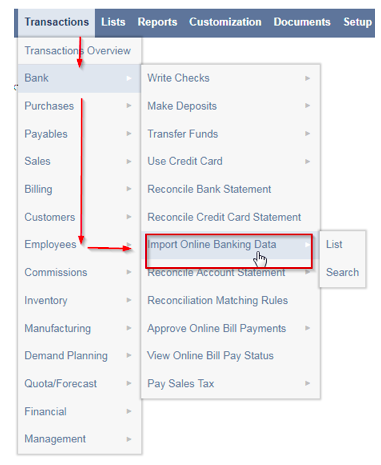
Note: NetSuite has a 50-character limit for file name and extension
5. Choose the name of the file you would like to import.
NetSuite will then display the confirmation for the Online Banking Data page with the number of imported transactions and matches.
7. If you would like to reference the uploaded statement, navigate to Transactions > Bank > Import Online Banking Data > List.
Intelligent Transaction Matching
NetSuite automatically matches imported statement transactions with general ledger transitions. With the last 2018.1 update, you have the ability to create unique matching rules with multiple conditions and add the order NetSuite runs them to find matches. When you upload a statement, specify the account with a custom rule and the Intelligent Transaction Matching feature runs and includes your new custom rules. Note: NetSuite only runs the rule against transactions for selected accounts.
How to create a new matching rule in NetSuite:
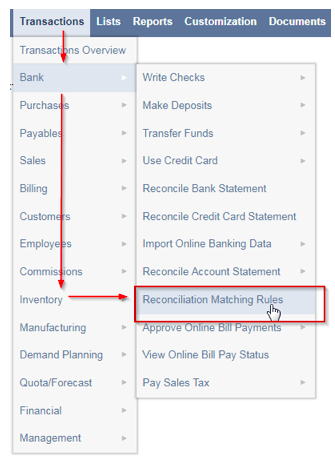
1. From your dashboard click Transactions.
2. Navigate down to Bank.
3. Go to Reconciliation Matching Rules.
4. Under Custom Rules, click New Rule (the accounts subtab defaults to automatically open).
5. Enter a Custom Rule Name for your new matching rule (required field).
6. Filter Options: Note: Different permissions to view and edit accounts are set based on your user role. Notify your administrator to edit reconciliation permissions.
Show Included Only – This will narrow down your list to only included accounts
Account Type – This will filter simply by type of account
Search Field – Enter account type, account name, description or currency
7. Check the box for the account with the custom rule.
8. Select the first transaction type from the Transaction Type list for this rule condition. Your selected transaction determines which options are available in the primary field and the Transaction Type list.
9. Select the first field on the Primary Field List (the list options depend on the selected Transaction Type).
Note: Memo Option – The memos in the NetSuite transactions lists are the memo values from the Check Headers or Journal Entry. Transactions cannot be grouped by the value in the memo.
10. Select an operator for the matching rule from the Operator list.
Operators include:
Equals – Selected fields must be equal.
Equals (Ignore Prefix) – Selected fields must be equal, but ignores leading zeros or prefix letters.
Within x Previous Days of – The number of days a date match can vary.
Before – The Selected transaction type date can be before the imported date.
After – The selected transaction date can be after the imported date.
11. In the Value field, enter the alphanumeric value (Equals, Equals (Ignore prefix) etc).
12. If not selected by default, select the second Transaction Type list which will give you which options are available on the list.
13. If not selected by default, select the field where the system creates its matching rule condition from the Compare Field list. This must be the same date as the primary field.
Note: Memo Option – The memos in the NetSuite transactions lists are the memo values from the Check Headers or Journal Entry. Transactions cannot be grouped by the value in the memo.
14. Select the add/delete icon to add/delete an extra condition.
15. Click Save to save and create a new custom rule. For your reference, this rule will now be under the Custom Rules heading.
16. Drag and drop the rules into the order you like.
Now you are ready to rock and roll! The next time you import your next statement, the Intelligent Matching feature will run and include your new custom rules.

Bank Feeds & Banking Improvements
Instead of managing every single bank transaction, NetSuite has streamlined the process by allowing businesses to automatically import transactions and balances from the bank directly into NetSuite without importing files. Save time, treasure, and talent by integrating NetSuite directly into your bank. Check out the latest banking questions that NetSuite users are asking about the latest release.
What banks and financial institutions are supported?
NetSuite supports thousands of financial institutions and banks with the latest release. To narrow it down, here is a high-level overview of the largest banks on the list. Interested in learning if your bank is supported? Check out the complete Bank Feeds list here.
SUPPORTED FINANCIAL INSTITUTIONS AND BANKS:
- Wells Fargo HSA Bank
- Chase J.P.Morgan Commercial Card
- Bank of America Merrill Lynch (Global Card)
- US Bank (SinglePoint)
- Union Bank of Mena
- Citibank Drive Card Credit Card
- Bank of the West
- Mechanics Bank
- California Bank & Trust
- East West Bank
- Westamerica Bank
- Tri Counties Bank
- Umpqua Bank (CA) Business Banking
- Pacific Western Bank (Business Bank)
- OneWest Bank
- BBVA Compass Spend Net Navigator
- Citizens Business Bank
- City National Bank (ePartner)
- First Republic Bank
- First Citizens Bank
- Central Valley Community Bank
- HomeStreet Bank
- Exchange Bank
- Bank of Stockton
- First Foundation Bank
- Oak Valley Community Bank
- United Business Bank
- Heritage Bank of Commerce (Business)
- Royal Business Bank
- First United Security Bank
- Marcus by Goldman Sachs
- TD Bank
- Capital One
- …and much more.
To help your organization make a smooth transition into the latest release, our NetSuite team is here for you. Have questions? Our consultants are available for on-demand services without service tiers or minimums. Read more about NetSuite Bank Feeds with our recent Bank Feeds Essentials blog.
Interested in finding out more about how NetSuite can help automate your banking process?
The truth is, we’ve only scratched the surface! Please contact us for a quick demonstration and make sure to check out other helpful tips, tricks, and how-tos on our NetSuite tips blog.
Whether you are looking for a one-stop-shop for all things NetSuite, or simply need answers to your questions, our award-winning NetSuite experts are here to make your business better. We provide support, administration, and process optimization to ensure organizations get a return on their investment.
Get NetSuite Services Today

Follow us on Social for NetSuite tips, tricks, and ERP fun:
YouTube, LinkedIn, X, Pinterest, Instagram, and Facebook