
11 min read

NetSuite Dashboard Overview:
You can create a unique dashboard set up to visualize the exact data you need to operate your role. For each user, NetSuite displays tabbed pages called the center. The center is based on the user’s role and provides the pages and links that each role needs to perform its daily duties. Most pages in each center display a collection of real-time data relevant to the page the user is viewing.
The dashboard is available on every page you see in NetSuite except documents, setup, and customization pages. Edit records quickly and visualize the overall picture of your business in real time to make better, faster, and more accurate decisions.
For each page, NetSuite provides a default dashboard configuration that can be changed to meet the user’s needs. For example, administrators can personalize the dashboards for one or more pages and publish them to a group of users so that they all see a consistent interface.
How to set up a NetSuite Dashboard:
- Go to Customization > Centers and Tabs > Center Tabs > New.
- Fill out the needed information:
- Label: This will be the name displayed in the Tab bar at the top of the dashboard.
- ID: an internal id for easy identification. A good practice is to start with an underscore.
- Center: Select the center you want this to display in. Classic Center, Accounting Center, or Sales Center.
- Add the Portlets to your Dashboard:
- To personalize your custom dashboard, you will make changes by clicking on the "personalize" button. Once it comes time to set up your new custom dashboard you can define the portlets you want here.
- To personalize your custom dashboard, you will make changes by clicking on the "personalize" button. Once it comes time to set up your new custom dashboard you can define the portlets you want here.
4 Things You Need to Know to
Set Up Dashboards
How to publish a dashboard in NetSuite
To publish a dashboard that has been configured to your business needs, click settings and go to publish dashboard. Enter the dashboard's name, notes, specific locks on shortcuts, and apply them to the roles you want the dashboard published to. Click save to publish a dashboard to its respective roles.
When a dashboard is published, each administrator has the option to publish in add/move content mode, unlocked mode or locked mode. The only mode that has no editing restrictions is in its unlocked state. When it is locked, the end-user can not make any edits. In add/move mode the user can move items around and add items on their login page but cannot remove content.
Understanding Dashboard Portlets
To see the information available to display on your dashboard, click the Personalize Dashboard in the settings portlet on the upper right of your screen. This panel displays everything you can add to your dashboard on the standard content tab. You have the ability to display one portlet per dashboard on a Standard NetSuite tab and multiple portlets on custom NetSuite tabs.
Adding a Portlet to a Dashboard:
Unless the dashboard is locked, you can add a portlet to a dashboard anytime.
Set Up Your Portlets
- Ensure you are using a role in a Center you want to publish to.
- NetSuite recommends creating a publishing role that correlates with each center that is used only for modifying and publishing dashboards.
- Navigate to the Custom Center Tab
- Set up each portlet as required
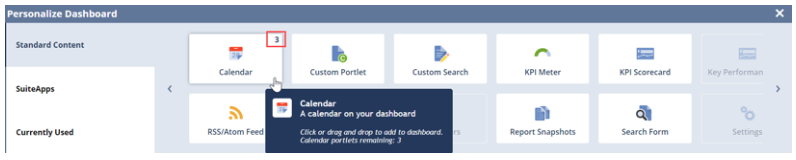
In the Settings portlet click Personalize Dashboard and the palette opens at the top of the page. In the other tabs, click the portlet icon to add it to the top of the page or drag and drop the portlet to a specific location. Hover over a portlet to see the number of available portlets for each category. After adding a portlet, you can modify the layout to any location on the dashboard. To remove a portlet click remove in the portlet menu.
Content Available for Display In Dashboard Portlets:
- Account Reconciliation Summary – Displays key data for reconciling activities.
- Analytics – Display up to 5 analytics charts – One workbook-based chart per portlet.
- Calendar – Drill down activities ordered by date/time.
- Custom Portlet – Display up to 6 results from SuiteScript as lists, links, data, html, etc.
- Custom Search – Display up to 6 saved search results on the home page.
- KPI Meter – Display up to 3 graphical meters of KPI data and download.
- KPI Scorecard – Performance comparisons of specific KPI indicator data.
- KPI – Key business metrics in a summary of reports, saved searches as date ranges, comparisons and results not meeting expectations. Define up to 4 KPIs as headlines and trend graphs.
- Links – Displays links to related NetSuite pages.
- List – Record lists selected by type with the ability to view and edit records.
- My Login Audit – Login activity to track activity, ip address login and details.
- New Release – Summary of new features with links to more information.
- Phone calls – List of approaching scheduled phone calls and links.
- Project tasks – Projects assigned to you and other project resources.
- Quick Add – Effortlessly add records to a selected type.
- RSS/Atom Feed – URL content from HTML document or website.
- Recent Records – Recently created, edited or viewed records.
- Recent Reports – Recently created, edited or viewed reports.
- Reminders – Tasks past due or soon to be completed.
- Report Snapshots – Display up to 10 custom reports in a graphical list.
- Saved Searches – Your Top 10 saved searches in a specific time period.
- Scheduler – View other employees schedules and activities.
- Search form – Form to search for records of a specific type.
- Settings – Links for set up tasks.
- Shortcuts – Navigate quickly to the pages you use the most.
- Tasks – Upcoming CRM tasks assigned to you.
- Trend graphics – Display up to 3 time-based KPI graphics in a single chart.
How to Apply Changes to Published Dashboards
Published dashboards save time and create a consistent interface for all related roles within the company. Your NetSuite role determines what displays as you log in, the set of tabs accessible, and the visual workspace defaulted to fit your exact business needs. To personalize your dashboard to the pages you use most or change your colors click set preferences to change visual aspects to all pages.
Changing a Published Dashboard
If you are an administrator, you can publish a personalized dashboard and share it with users that have specific roles in the center.
1. Log into the role you created and published the dashboard.Changes to a dashboard installed by a bundle may be applied automatically as a part of bundle updates. In order to refresh the page after a dashboard has been created, users may need to log out and back in or clear cache to refresh the system.
Publishing a Dashboard to Different Roles
If you want to publish dashboards to users of multiple center’s, you most log into each center and create the dashboard to be published to each centers users. Subsets of centers are tied to sales, marketing, support and administrator.
How to switch your interface to show the same tabs and organization as an administrator role:
1. Navigate to Home > Set Preferences.
2. Click the Appearance subtab.
3. Under Centers & Dashboards, check the Use Classic Interface box.
4. Save.
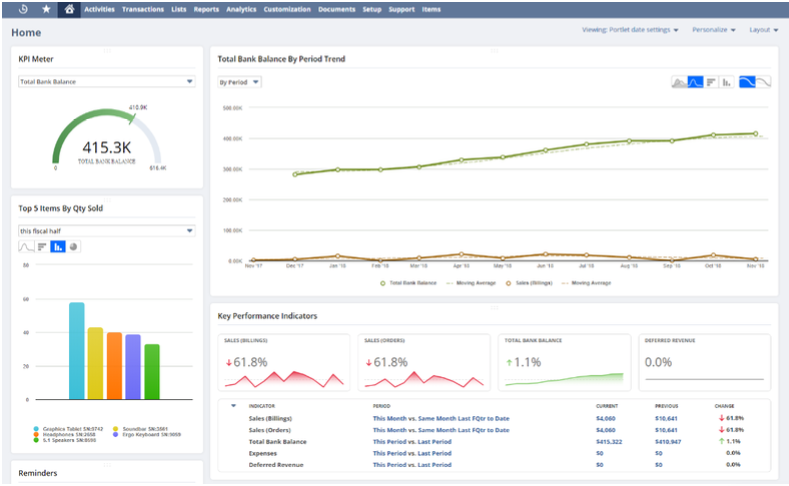
How to Optimize Your NetSuite Dashboard
NetSuite makes it easy to gain visibility to the information you need most from report snapshots, trend graphs, and KPIs. From the home dashboard, click Personalize at the top right. Use the default list to select the most important reports that enable you to drill down to the data or display the data visually.
User Interface Enhancements
New & Improved Dashboards
NetSuite dashboards have been enhanced with many new functional and visual elements. Dashboard graphics are clean, modern, and colorful with a new look and feel, portlets have been updated with new design elements, and improvements have been made for faster navigation. The new design improves readability and enables you to have a clear visual overview of your dashboard data.
New Analytics Portlet
This new portlet allows users to view chart-based workbook data at a glance on your home dashboard.
Trend Graph Portlet
Major improvements have been made to display KPIs in a single chart. Before this update, companies could only show the differences in data over time for one KPI; now you can compare up to three.
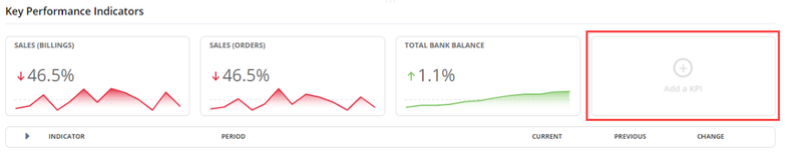
Key Performance Indicators Portlet
Rapidly add up to FOUR KPIs by clicking the add a KPI icon in the portlet by clicking add a KPI icon. Trend graphs are now included for each KPI headline that you consider the most relevant. This new condensed format enables you to see all data at a glance (compared to a scroll bar) and allows users to expand and collapse the list of KPIs needed.
New Enhancement to Personalize Dashboard Palette Navigation
Quickly locate the portlets you use most with a reduced number of displayed icons. With the new update, a single icon displays for each portlet type and includes a badge count. The dashboard now displays one icon with the number of portlets you can add to your home dashboard next to it. The new design also optimizes the palette structure by reducing the number of tabs based on the assigned role and permissions.
Have a NetSuite Question? Need help with NetSuite? Let’s talk! Protelo’s NetSuite experts are here for you!
Our senior team of experienced NetSuite consultants is available and happy to assist right away. We work on-demand when you need us. No long-term commitments or retainers. Get direct-to-expert access!
We can help you to implement, service, and support NetSuite today.
Call us for direct access to the experts…the first time you dial or contact us through our online form.
NetSuite Tips & Tricks
Protelo offers many different resources to make using and customizing NetSuite a breeze.
Here are a few more to get you started:
1. The Ultimate Guide for NetSuite Administrators
2. NetSuite Global Search Tips
3. NetSuite How To: Import Online Bank Data & Auto Match Transactions
4. Customizations In NetSuite: What To Know
5. NetSuite Tip: Creating Custom Fields In NetSuite