Want to be more efficient inside NetSuite? Boost your business productivity and NetSuite knowledge with these helpful how-to’s from our NetSuite consultants.
1. How To Create Custom Address Forms
In NetSuite, vendor and customer addresses are widely used in external documentation. They are a key component to daily business from entering a lead all the way to checks and invoices. Since the majority of NetSuite customers are located inside the U.S., here are a few tips to follow the U.S. address standard and customize to a more conventional format.
Creating a custom U.S. Form:
1. Customization > Forms > Address Forms
2. Select “Customize” on the Standard Address Form
3. Label the new custom form “U.S. Address Form”
4. Address Template:
• Cut and Paste to be above in the address template window.
• Add a comma after and delete
5. Fields Subtab:
• Move the “Addressee” field above the “Attention” field in the field
• Check the “show” box and Uncheck the “Same Row As Previous” box
• Move the zip field above the city field
6. Select “United States” in the country subtab (US will no longer be displayed on forms)
7. Save custom form.
*Fun fact: Now that the zip code is above city and state (entering the zip code field first) NetSuite will auto-populate the City and State information for you! This shaves time off of every single manual address entry. Yahooo!
2. How To Use The Search Performance Details Dashboard
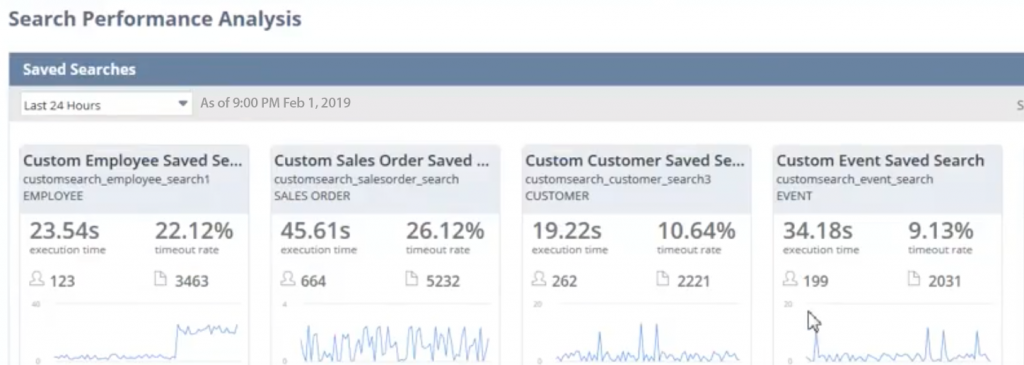
NetSuite’s Search Performance Details Dashboard equips you with an enhanced, in-depth view of each saved search with statistics and performance. The dashboard has two portlets, provides charts, summary lists, and logs of each specific saved search.
How To Access The Search Performance Details Dashboards
Go to Customization > Performance > Search Performance Details.
Go to Customization > Performance > Search Performance Analysis and click a saved search title.
*By default the portlet displays your top 10 most requested saved searches. From the search performance analysis page you will see the filters in a collapsible view, the saved search details portlet and the saved search by context portlet.

How To Filter Data On Search Performance Details Dashboard
Start Date & Time and End Date & Time: Identify the start and end dates by clicking the equivalent calendar icon and selecting the correct dates. Click on the dropdown lists to change the start and end times.
Saved Search: Use the saved search drop-down list to filter data for a specific saved search or show data for all saved searches. Click refresh on the upper left corner to apply changes in data filters.

The Saved Search portlet displays your performance statistics in detail. A summary of data appears when you hover and click over any of the values in the chart.
3. How to Expand & Collapse NetSuite Tabs Without An Icon
Quickly learn how to access the icon for expanding and collapsing tabs in your NetSuite user interface if it disappears.
With NetSuite’s flat design navigation, it’s not always obvious that the displayed elements in the blue colored bars are tabs. To organize data, NetSuite defaults to display an unrolled view of its tabs. In the upper right-hand corner an icon allows you to click and expand or collapse categories of information. But what do you do when the icon is missing? Don’t spend the extra time scrolling to get through your system or looking for answers, check out this little tip!
Add a Parameter to the URL
To modify the NetSuite page you are currently on, add the below text to the end of the URL.
(If the contracted view is on, the three lines on the far right of the menu bar will appear.)
For example:
Your URL: https://system.na3.netsuite.com/app/common/entity/custjob.nl?id=199671&whence=
Add to the end: https://system.na3.netsuite.com/app/common/entity/custjob.nl?id=199671&whence=&unlayered=F
Last week, our marketing team was able to utilize this parameter when a NetSuite plugin wasn’t behaving properly in the tabs collapsed view. When we went to expand the tab, our icon was missing. As we plugged in the parameter and expanded the tab, the plugin worked temporarily by scrolling down the page until the bug was fixed. Our NetSuite consultants have worked inside NetSuite for many years and when we come upon tricks like this we are happy to share.
4. How to perform a CSV Import
Comma-separated value imports save time, remove the need for manual data entry, prevent errors and are the most commonly used method for transferring data into NetSuite.
*Quick tip: Make sure you scrub your data before importing it. It will save you time and ensure your system is up to date with current information.
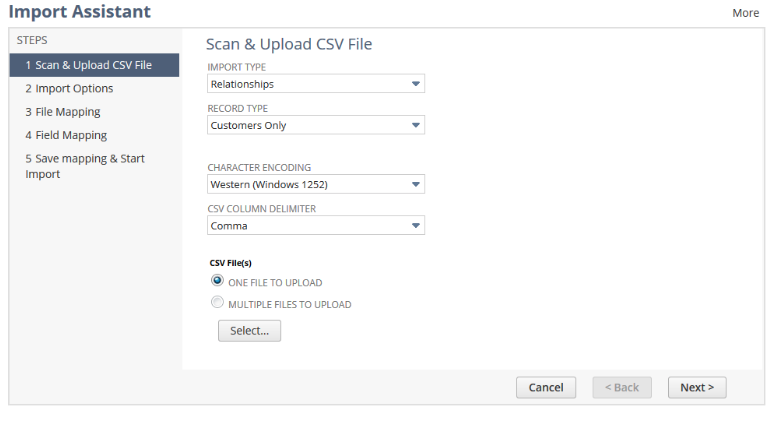
An Import Assistant is available for most CSV imports providing a step by step guide to assist users through the import process.
If you have the Import CSV File permission:
Setup > Import/Export > Import Tasks > Import CSV Records (Administrator).
Your role and permissions determine the types of data you can import with the Assistant.
After you have saved the import, you can share it and reuse it for later imports.

Simplified versions of the Import Assistant are available for:
1. Import budget data: Locate the budget import assistant at Transactions > Financial > Set Up Budgets (Administrator) > Import. *Need to have Set Up Budgets Permission
2. Microsoft Project tasks data: Locate the project tasks import assistant at Activities > Scheduling > Project tasks > Import (Administrator). *If the Project Management feature is enabled.
3. Single inventory worksheet data: Locate the single inventory worksheet import assistant at Transactions > Inventory > Adjust Inventory Worksheet > Import (Administrator). * Need Adjust inventory Worksheet permission.
4. Website redirects: Locate the website redirects import assistant at Setup > Site Builder > Setup Tasks >
Redirects > Import (Administrator), *when the Web Site and Host HTML Files features are enabled.
5. Single Journal Entry Data: Locate the single journal entry import assistant at Transactions > Financial > Make Journal Entries > Import (Administrator).
If you use NetSuite OneWorld, the single intercompany journal entry import assistant is available at Transactions > Financial > Make Intercompany Journal Entries > Import (Administrator). * If you have the Make Journal Entry permission.
Check out more NetSuite tips, tricks, and how-to blog posts from our experts! We can help you to implement, service and support NetSuite today!!

NetSuite Tips & Tricks
Protelo offers many different resources to make using and customizing NetSuite a breeze. Here are a few to get you started:
1. Check out our Tips, Tricks, and how-to blog page
2. NetSuite Global Search Tips
3. NetSuite How To: Import Online Bank Data & Auto Match Transactions
4. Customizations In NetSuite: What To Know
5. NetSuite Tip: Creating Custom Fields In NetSuite
6. NetSuite Inbound Shipping: An Explainer
Protelo is a 5-Star NetSuite reseller and has an experienced IT team with over 20 years in the software industry.
Got a NetSuite Question? Need help with NetSuite? Let’s talk! Protelo’s expert consultants have the Suite answer!
No contracts for services & troubleshooting, no minimums…If you have a NetSuite question, shoot us a line. Check out our extensive NetSuite services list. Our senior team of experienced NetSuite consultants is available and happy to assist right away. We work on-demand, when you need us. No long-term commitments or retainers.


